Friday, July 29, 2016

Send and Receive Multiple Files with Ease


Emails have become essential in daily life, both for professional and personal means. There can be several reasons to send emails with multiple files, whether it is work documents, family albums, vacation itineraries, receipts, etc... But most email servers contain a limit on the amount of data that can be sent in a single message. By properly using a program to zip files, organizing and sending attachments can become an easy procedure. Express Zip can increase email efficiency and provide tools to organizes files.


Send a Zip as an Email


Step #1
Download Express Zip, open the program and select "New Archive." At this point, select "Add Files" and choose all the files you wish to compress into an email. Once the files have been added, there are a few more options that can take place.

Step #2 
To email the zip file, find the newly created archive file in the chosen output folder. When writing an email this can simply be attached by either selecting, "Add Attachment," or dragging and dropping the folder into the body of text.

*Second Option*
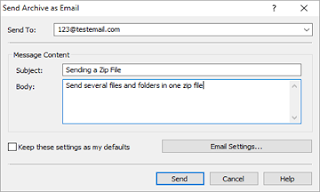
Express Zip has the ability to send an email directly from the program. Simply click the "Email," button and after filling out the necessary information the email will be sent with the archived attached.


Open a Zip File Through Email


Step #1
Find the email with the zip file and save the file to a chosen folder. For accessibility, it is recommended save to the desktop. Now open Express Zip and select "Open Archive" under the File Menu or click the top left "Open" button.


*Second Option*
Right Click or CTRL Click on the the Zip File and select "Open With." Choose Express Zip and the program should enter, displaying the same materials.


Step #2
All the files that have been extracted will be visible. Now select the proper Output File, and finish the process by "Extract Selected" or "Extract All." All the files are now available to be viewed.

Express Zip is available for Free, Download Here.

Wednesday, July 27, 2016

Friday, July 22, 2016

How To Create a Slideshow with PhotoStage

Create a SlideShow in Minutes with PhotoStage


With the popularity of smartphones and social media, photography has become increasingly prevalent and nearly everyone has a large number of photos from past trips, adventures, and day-to-day events. One great way to save memories, photos, videos and audio recordings for posterity is by creating a slideshow. With PhotoStage, creating a slideshow is simple and even fun to do!

How to Create a Slideshow with PhotoStage

Creating a slideshow with PhotoStage is quick, easy, and fun. PhotoStage is available for download online on nchsoftware.com- simply download and get started creating slideshows today!

Step 1: Upload Photos, Videos, and Audio

To begin creating your slideshow, click on the "Add Photos", "Add Videos", and "Add Audio" buttons to upload your media to PhotoStage. All uploads will show up under the "Media" tab. 

Step 2: Add Media to Slideshow

To add images, video, or audio to your slideshow, simply drag and drop media on the Slideshow area.

Step 3: Save and Export Slideshow

While you are editing your slideshow, you can stop and save your project to return to edit it at a later point in time. To save your project, select "Save Project File" from the File menu. When you have finished your slideshow, you can export it to share with friends and family, To Export your finished slideshow, select "Export Slideshow" from the File menu and follow the prompts that appear on the screen. You can export your slideshow directly to a disc, YouTube, or social media, or you can save it as a file on a computer or portable device. 

Optional Features and Effects

Adjust Slide Duration

Adjusting the duration of your slides is easy. Slides are automatically set to each show for 3 seconds. If you would like to display a photo for a longer or shorter period of time, click on the slide you would like to edit. This will open a dialogue box with a preview of the image and an option to change the duration in seconds. Simply adjust the duration and click "Apply" to change the amount of time that a slide will be shown. If you would like to change the duration of all of the slides in your slideshow, click the "Apply to all" box before you click "Apply". 


Change Slide Transitions 

PhotoStage offers a variety of different transitions that can be applied to a slideshow. To change a transition, click on the button between slides. Popular transitions include, "Fade through White", "Shatter", "Zoom", "Slide" and "Morph". Try out different transitions to see which you like the most. Transitions automatically last for 0.5 seconds, but you can also adjust the duration of transitions by clicking on the bottom of the transition icon. 

Add Music to Slideshow 

Background music can be an extremely effective tool to convey emotion in a slideshow. To add music to your slideshow, click on the "Add Audio" button and select an audio file from your computer. Drag and drop the audio file from the Media tab to the SlideShow area that says, "Drag your sound clips here".

Add Text to Slideshow Slides

You can also add text to your slideshow. This is useful for noting dates and adding names or descriptions to photos and videos in your slideshow. When adding text, you have two options: you can overlay text on a photo or video, or you can create a blank slide to display text.

To add a blank or solid colored slide to your slideshow, click the "Add Blank" button on the top bar of Photostage, or right-click and select "Add Blank Slide". 

To add text to a slide, select the slide and select a Text option from the "Text" tab. You can then edit the text, and change colors, fonts, opacity, and alignment. 

Download PhotoStage to Get Started Today!


Friday, July 15, 2016

Convert Videos of Family Moments from Phone or Tablet Device


Tablets and mobile devices have made it incredibly easy to capture videos and pictures of daily life. Precious moments can now be easily recorded without the hassle of developing; but what about transferring or sending these videos to others? With the addition of Prism, all will have the ability to easily convert media into physical or digital copies.

Follow These Easy Steps

Step 1: Transfer the videos from the mobile device to a local computer. This can be done with either a USB Connection, Email, or File Sharing Service.

Step 2: Download the free version of NCH Prism for non-commercial use. After the download is complete, click "Add Files," this will bring up the files of the computer. Select each video that is to be converted; Prism can convert multiple videos at once.


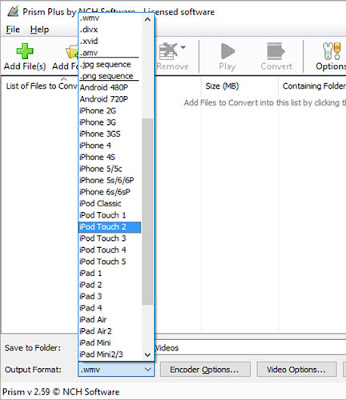
Step 3: With all the videos uploaded, select which format is most suitable. Prism provides conversions for avi, mpg, vob, asf, wmv, and mp4 video formats from digital and physical platforms. The videos can be matched to several mobile devices, tablets, gaming systems and mp4 players.


Step 4: Before finishing the conversion process, feel free to add any video effects and previewing before finalizing. Adjust colors, screen size, resolution, add captions or watermarks, bring more creativity to the videos with these easy edits.
Step 5: After choosing the videos, making the appropriate edits, selecting the output format and previewing the video for assurance. Finalize the conversion process to either a digital file or DVD. This ability to transfer and compress digital files makes it easier to send media to others through emails, phone messages or post on social media. There is even an option through Prism to directly share these new converted files directly onto social media.

Want to create a home movie? Place a blank disk into the computer, select it before the conversion by clicking, "Browse." Then select the blank disc for the targeted conversion.


Prism is available online and the Apple Store.


New Release: Switch Sound File Converter for Windows

Download Switch 5.04 now at www.nch.com.au/switch/index.html. Also available for Mac OS X and Android at the same page

Monday, July 11, 2016

Friday, July 8, 2016

How to Change WAV to MP3 files with Switch WAV Converter

How to Change WAV to MP3 Files with Switch WAV Converter


Audio files exist in a wide variety of formats, each with its own benefits and potential drawbacks. When editing or playing audio tracks, you may need to convert from one format to another to suit your distribution needs.

What are WAV Audio Files?

WAVE files are uncompressed, lossless CD-quality music files. Though they are popularly known by their file extension, .wav, WAVE stands for Waveform Audio File Format. WAV files can contain compressed audio, however, they are more often used to take advantage of uncompressed audio. 

 When Should You Use WAV Audio Files?

Due to their uncompressed nature, .wav files are the best choice for radio, TV, DVDs, and other projects that require uncompromised high-quality audio tracks. As a result, it is uncommon to share WAV files on the internet because uncompressed audio files are often very large files and result in slow file transfer. WAV files are favorable for keeping archived versions of original recordings as they will retain original audio quality.

What are MP3 Audio Files?

MP3 is a compressed, lossy format that is widely used for audio tracks on the internet in web pages, web videos, audio sharing, and more. MP3 audio files are extremely popular because they take up very little disk space due to being compressed to roughly one-tenth of their original size. 

When Should You Use MP3 Audio Files? 

MP3 audio files are able to load quickly while retaining high audio quality, which makes them favorable for use on web pages, in embedded videos, in audio sharing, and in multimedia presentations.  However, this popularity is a double-edged sword as compressed MP3 audio tracks retain less information and as a result, can be more difficult to edit.

How To Change WAV to MP3 Files

After editing an original audio recording in WAV format, you may want to compress your file for easy sharing on the internet. Switch Audio Converter is a simple audio converter that can accomplish WAV to MP3 conversion quickly and easily. Switch also has the option to batch convert audio files, which is efficient and effective for audiophiles who need to change hundreds of audio tracks in a short period of time. 

Step 1: Load WAV Files

In order to change WAV to MP3 with Switch, begin by loading the WAV files that you would like to convert. To do this, open Switch Audio Converter and click on the "Add File(s)" button.


Step 2: Select Audio Output Format 

Once you have added the WAV audio files that you would like to convert, select the audio output format that you would like from the "Output Format" selector at the bottom left of the Switch window. 


You can also select a specific folder where the converted file will be saved, or check the box to output to the same folder as the source file. 

Step 3: Change Audio Files

Now that your file has been added to Switch and you have selected MP3 as your desired output format, simply click the "Convert" button to change your files!


Once your file has been converted, a prompt will appear allowing you to be taken directly to the output folder you selected, or to open the file directly. 


Congratulations! Your new MP3 file is now ready to be shared with the world.


Download Switch Audio Converter to Get Started!


More Audio Posts from NCH Software: 


Thursday, July 7, 2016

Wednesday, July 6, 2016

Monday, July 4, 2016

Just Released: MixPad Multitrack Recorder for Mac OS X

Download MixPad 4.08 now at www.nch.com.au/mixpad/index.html. Also available for Android, iOS and Windows at the same page